
This page will show you how to program your Circuit Playground using Arduino or Python Firmata Firmware, as well as explain how to go back to to the Embedit Scratch firmware that comes pre-installed if you bought the Circuit Playground Inventor’s Kit. Support for Arduino and Python on the Circuit Playground is maintained by Adafruit, what I will show you here is how to re-program your Circuit Playground to support those languages.
Note: Right now these instructions are only for Windows. Going back to the Embedit Circuit Playground Scratch firmware might be tricky or impossible if you’re not on Windows after you overwrite it in the Arduino IDE.
Programming with the Arduino IDE
Arduino is a community driven open source platform that works on a variety of micro controllers, including the Circuit Playground. It’s a great next step after Scratch if you want to create more complex projects. An added benefit is that Arduino code is saved directly to the Circuit Playground, so it doesn’t need to be plugged in to the computer to run. This allows for battery powered projects. There’s also a large Arduino community that has a huge number of open source projects you can make use of.
Once you load any firmware on the Circuit Playground using this method, you won’t be able to use the Scratch App until you reprogram it with the Embedit Scratch firmware again.
Follow Adafruit’s setup tutorial right up until it’s time to actually load the firmware (when you get to the “Run the Demo” header on the libraries page) onto the board. You should now have the Arduino IDE installed with the Circuit Playground library. That’s where our instructions come in. The Circuit Playground from Embedit uses LUFA HID USB libraries which means that the Arduino IDE can’t detect the Circuit Playground board over serial as it normally would. You’ll have to do the following:
- Open a project in the Arduino IDE. (For instance, in the Arduino IDE go to: File->examples->Adafruit Circuit Playground->demo)
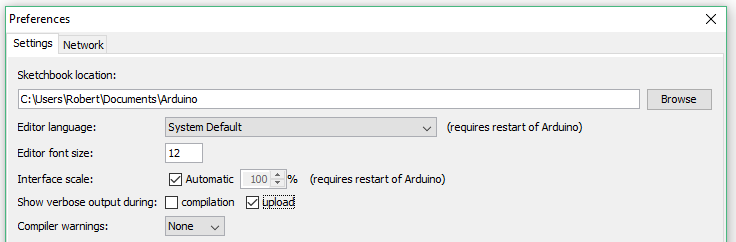
- Go to File->Preferences, and the check the “upload box” next to the “Show verbose output during:” text.
- Go to Tools->Board, and select the Adafruit Circuit Playground. You might have to scroll down to the bottom of the list to find it.
- Click the upload (arrow pointing right) button go begin the compilation and upload process.
- After several seconds the area at the bottom of the Arduino IDE window will switch from saying “Compiling Sketch” to “Uploading.” When it does, quickly tap the Reset button on the Circuit Playground twice. This will put it into bootloader mode, allowing it to be programmed.

Tap the Reset button twice when the Arduino IDE begins searching for the COM port.
Programming with Python Firmata
Python support is done through Python Firmata firmware Adafruit has created for the Circuit Playground. The installation instructions are the same as above, except that you’ll be loading this firmware on the Circuit Playground instead.
Adafruit’s Python Firmata write up.
Going back to the Embedit Scratch Firmware
If you want to use the Circuit Playground with Scratch again, you can use one of the following two methods to program your Circuit Playground with the latest and greatest firmware:
Program with latest Scratch firmware using AVRDUDE
This is the easiest method if you just want to go back to the Scratch compatible firmware. With this method we will use a program called AVRDUDE to reprogram your Circuit Playground with the most up to date Embedit Scratch firmware, without needing to use the Arduino IDE.
Windows Download – Zip Folder (You’ll need java to run the program)
Windows Instructions
- Unzip the folder and then double click on “CircuitPlaygroundFirmwareUpload.jar” to run the firmware upgrade program.
- Plug your Circuit Playground into your computer. The program should recognize that its plugged in.
- Push the Reset button twice in quick succession on the Circuit Playground. You should see the red LED next to the USB port slowly pulsing on and off. The program should acknowledge the reset and begin uploading the firmware.
- A pop-up should appear and tell you the programming was successful. That’s it!
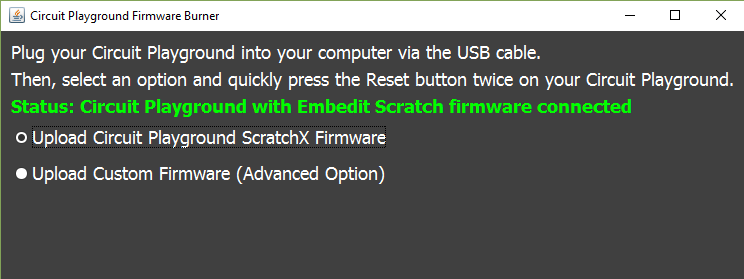
Circuit Playground Firmware Upload Application showing the Circuit Playground is detected.
OS X Instructions
- Double click on the DMG file you downloaded. You can drag it to applications or simply launch it.
- A security warning might pop-up and prevent you from running the application. To run the application, go to System Preferences->Security and Privacy on your Mac. At the bottom of the security window click the “Open Anyway” button and the application should launch.
- Now plug your Circuit Playground into your computer. The program should recognize that its plugged in.
- Push the Reset button twice in quick succession on the Circuit Playground. You should see the red LED next to the USB port slowly pulsing on and off. The program should acknowledge the reset and begin uploading the firmware.
- A pop-up should appear and tell you the programming was successful. That’s it!
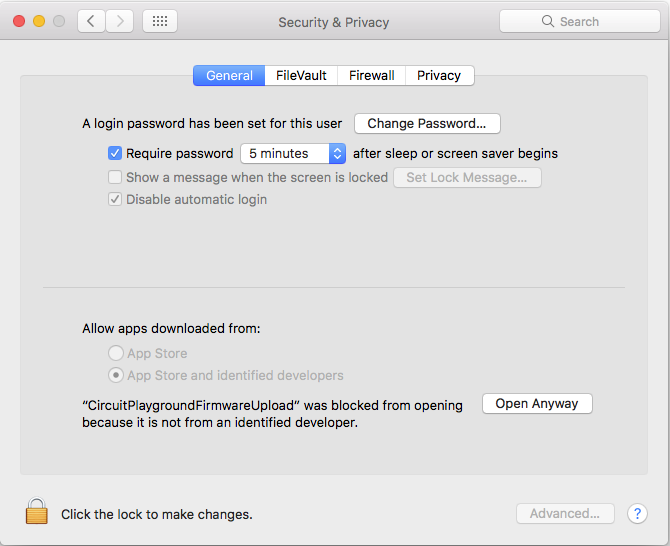
Security and Privacy settings page. Click on Open Anyway to launch the firmware upgrade application.
Setup Arduino IDE to be able to edit and upload Scratch firmware
For advanced users only. This can break your ability to program other Arduino boards. This method will setup your Arduino environment to allow use of LUFA USB HID. This will disable use of the default Arduino USB libraries (including use of serial and the serial terminal) in your projects, so you should make a backup of your Arduino directory (default location: C:\Program Files (x86)\Arduino) before proceeding. That way you can go back to a normal Arduino environment whenever you need to. I’ve tested this with Arduino version 1.6.11 and 1.8 (when installed via the Windows installer, not the Windows app), but a newer version might work. If you don’t have the Arduino IDE, get it here.
First, you’ll want to download this zip file with the Arduino environment setup for LUFA. Extract it and replace the avr directory in Arduino (default location: C:\Program Files (x86)\Arduino\hardware\arduino) with it.
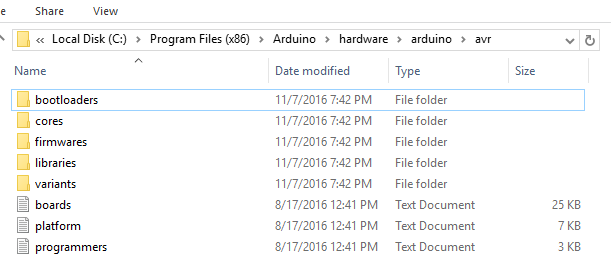
The inside of your avr folder should look like this, make sure there isn’t an extra avr folder when you unzip it.
Next, you’ll want to make sure you have the following Arduino libraries installed (they should be in Documents\Arduino\libraries):
- Adafruit_NeoMatrix
- Adafruit_NeoPixel
- Adafruit-GFX-Library
You can install each of them from directly inside the Arduino IDE by doing the following:
- In the menu click Sketch->Include Library->Manage Libraries…
- Type one of the library names above in the search box. You should then see the library listed. Select the newest version and install.
Now you’ll need to unzip and put our LUFA_hid library and Circuit Playground library with the rest of the libraries. This is where our our Scratch firmware resides.
Finally, you need to add board definitions for the Circuit Playground in the Arduino IDE by doing the following:
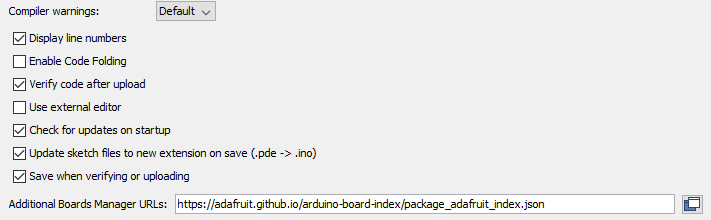
1. Go to File->Preferences. Then add the following url in the “Additional Board Manager URLS:” box near the bottom:
https://adafruit.github.io/arduino-board-index/package_adafruit_index.json
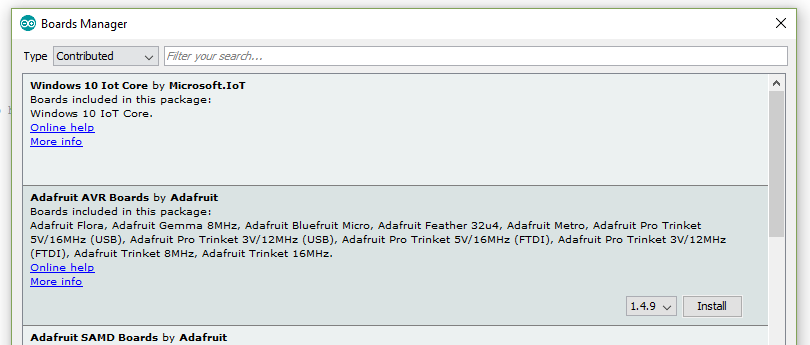
2. Hit OK and then go to Tools->Board-> Board Manager.
3. Change the “Type” filter at the top to “Contributed.” You should see “Adafruit AVR Boards” as one of the options. Click it and hit install.
4. Close the board manager window. At this point you should exit your Arduino IDE. You’re all set.
If everything is setup right you should be able to open the firmware in the Arduino IDE, and hit the “Verify” check mark button to compile it without any errors. It can be found here (you can even copy paste it into the bar at the top of file explorer to go right to it):
This PC\Documents\Arduino\libraries\LUFA_hid\examples\CircuitPlaygroundHIDScratch\CircuitPlaygroundHIDScratch.ino
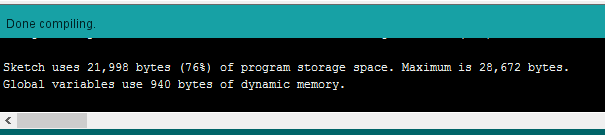
Success!
If you can encounter an error when trying to compile the most common cause is Arduino still using old libraries instead of the new ones we just installed. This can be remedied by forcing a clean build. The easiest way is to go to Tools->Board, and select any other board. Try to compile and let it fail. Then Select the “Adafruit Circuit Playground” again at the bottom of the boards list and try to compile again. If you still have an error, please make sure you have all the libraries installed, and the avr folder copied. After that, feel free to post a comment with your orange compiler error.
Editing the Scratch firmware
Incoming reports and polling requests come over USB HID, and are sent at 50 millisecond intervals. In the main Arduino loop function you’ll see the following switch:
switch(echoReportData[0]) {
The first byte of the incoming report, echoReportData, is a letter corresponding to a command sent by a Scratch block from our Circuit Playground extension. Each additional byte is context specific for the command. For instance, for setting a neopixel on the Circuit Playground (the first one, letter “O”), byte 1 is the LED number, and the next three bytes are its RGB values.
If you scroll down the switch statement to the letter “G” you’ll see that this is a special case. If the next byte of echoReportData is “3” then the Circuit Playground is being sent a polling request. This is the Scratch connection app asking for readings from all enabled peripherals. We proceed to read them all and then load them up into our outgoing report, outReportData. This outgoing report currently has 18 total usable bytes (0 to 17), so you can add more peripherals to get sensor readings from, add them to the outgoing report, and then add them to Scratch easily.
If you want to add a new command, pick an unused letter and add it to the switch statement. Then use up to the remaining 7 bytes to take in any data needed for that command. In this way you can add and control new peripherals that are Arduino compatible (especially if they already have Arduino libraries for them) and add them into Scratch. All the code I used is in there, so take a look at how I control the Neopixels and Servos with standard Arduino and Adafruit libraries.
The other part of this equation is adding the corresponding block to control or get readings from your new peripheral into the Scratch extension, which we will detail in the next section.
Editing the Scratch Extension
First, you’ll want to download our ScratchX extension (regular or advanced) off github. This is a single javascript file that allows you to add new blocks and edit existing ones. It might help to look at the ScratchX developer documentation to understand how blocks and their corresponding javascript functions are made and called.
For our purposes, there are two types of blocks, Command blocks and Reporter blocks. Command blocks will send a command to the Circuit Playground, such as a block that sets a neopixel color. Reporter blocks will retrieve a value from a peripheral, such as the status of a touch sensor. I’m going to walk you through adding a new command block. Say we wanted to be able to control a Neopixel with individual RGB values instead of just selecting a predetermined color (this is a command from our advanced Scratch extension which allows variable usage for neopixels). We first would add a block in the descriptor section:
[' ', "Set Neopixel Ring %n to R:%n G:%n B:%n", "setRingLed", 1, 255, 0, 0],
This will create a block that looks like this:
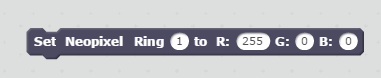
When activated, this block will call the “setRingLED” function (which we have to write) along with the values put into the block. Our function looks like this:
 //set a neopixel on the circuit playground
 ext.setRingLed = function (lednum, redC, greenC, blueC) {
     lednum--;
     if(lednum < 0) lednum = 0;//make sure our neopixel number is in bounds
     if(lednum > 9) lednum = 9;

     redC = fitTo255(redC); //fit our input to 0-255 range
     greenC = fitTo255(greenC);
     blueC = fitTo255(blueC);

     console.log("neo ring:" + lednum + " R:" + redC + " G:" + greenC + " B:" + blueC);//output result to console for debugging

     //our hid report to send to the circuit playground. Letter "O" tells it this is the neopixel ring command
     var report = {
         message: "O".charCodeAt(0),
         lednum: lednum,
         red: redC,
         green: greenC,
         blue: blueC
     };
     hPort.postMessage(report);
 };
Finally, I recommend you rename your extension so you don’t get it confused with the unedited Embedit one. You can do that by editing the text ‘Circuit Playground Adv’ on this line at the bottom of the javascript file:
ScratchExtensions.register('Circuit Playground Adv', descriptor, ext);
Using your edited Scratch Extension
Here’s how you launch your edited Scratch Extension.
- Launch a blank project as you normally would from the scratch connection app.
- Click on the “Circuit Playground” header in Scratch and then click “Remove extension blocks.”
- Now Shift-Click on the “Load experimental extension” button which will bring up an explorer window.
- Navigate to where you downloaded and edited the javascript plugin and you should be all set.
You should now see your Scratch extension blocks available.
Tip: If your extension doesn’t appear to be working, you might have a javascript syntax error. The easiest way to check is to bring up the Chrome Console in your Scratch window by hitting “Ctrl+Shift+J” simultaneously on your keyboard. The console will pop up on the right side of the chrome window. Any text in red means an error. All of the Embedit Scratch blocks also output their values to the console, using the “console.log()” function, which you can also do in your blocks for debugging.
Jeff Tennis
June 22, 2017 at 1:28 pm
The .jar file recognizes my circuit playground, and the status mentions that a reset is detected, but simply hangs at “trying to update firmware”. I’ve tried both the ScratchX version and “advanced option”, yet neither work. Do you have any advice? We’d really like to use the Scratch extension as it looks very promising.
Robert Barron
June 22, 2017 at 7:53 pm
Hi Jeff,
I’ll email you a follow up and see if we can figure out what’s wrong.
Thanks
JJ Jansky
March 5, 2018 at 10:29 am
Hi Robert,
I am having the same problems and Jeff did last summer. Maybe you can help me as well?