Here you will find all of our Scratch documentation and tutorials. Scratch with the PiSoC is the perfect way to get introduced to both programming and electronics, no experience needed!
You can get an intro to using Scratch over at the Scratch website. There you can make projects, or play and edit other people’s projects to get yourself familiar with it. You can also follow the Scratch tutorials built into the program.
Installation – This will guide you through installing Scratch and our PiSoC USB drivers on your computer
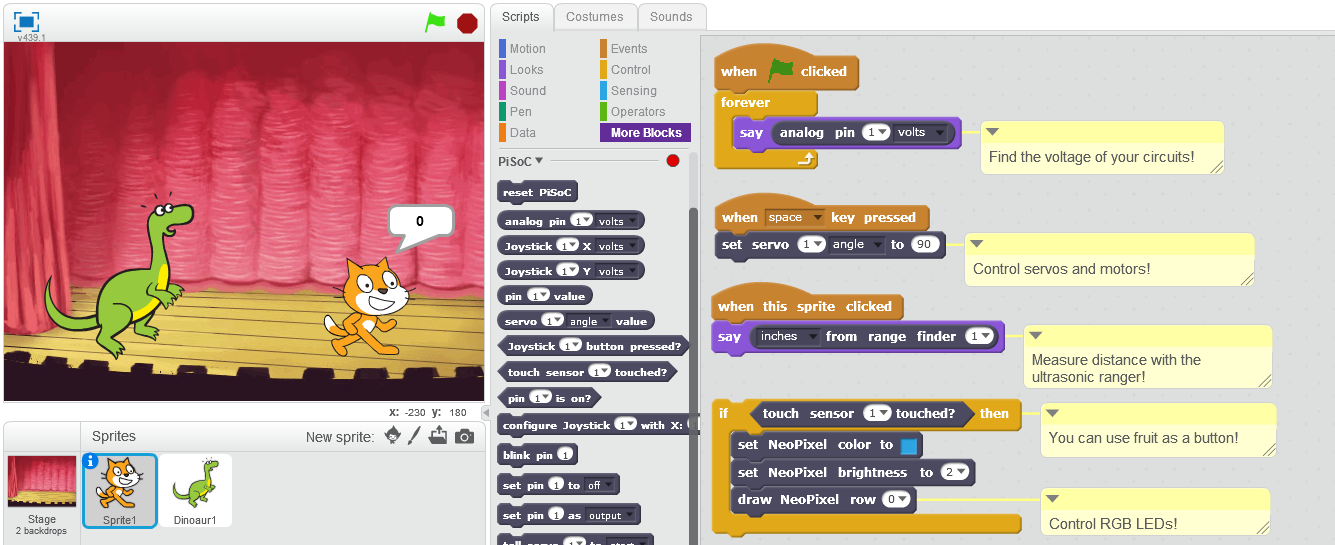
Scratch Blocks – An overview of each of our Scratch Blocks
Tutorials
- Examples – You can find several example projects in the folder you installed the PiSoC to. These are the “project_name.sb2” files in the Scratch examples folder. You can double-click on them to open them in Scratch. If you can’t find them, get it here. You can also go to our github to get the latest version.
Usage
How to use the blocks in your Scratch project
First, plug your PiSoC board into the computer with a Micro USB cable (a non-iphone phone charger cable should do it). Make sure the PiSoC’s slide switch is in “Run” mode before you plug it in.
- If you used the Windows installer, use the “Scratch Launcher” or “Neopixels Launcher” icon on the desktop, or in the “Embedit” folder in the Start menu. This will open up a new project with our PiSoC extension already set up. You can find the PiSoC blocks under the more blocks tab.
- If you want to open one of our example Scratch projects, you just need to run the “scratch_soc.py” file in the Scratch folder by double clicking it. Then, open up any of the example projects.
- You can also add the PiSoC extension to an existing Scratch project.
- Go to your PiSoC’s installation folder and navigate to the scratch folder (if you cant find it, just use your file browser to find the “scratch” folder or just search for “scratch_soc.py”)
- Then double click on “Scratch_soc.py” to open our PiSoC communication program.
- Now you can open the Scratch 2 program. Once in the program, hold left the shift key on the keyboard and click on “File” at then same time, then click on “Import experimental http extension“.
- Navigate to your Scratch installation folder (on Windows, program files(x86) ->embedit->scratch) or to where you downloaded our PiSoC Scratch files if you did a manual install. Now open “pisoc.s2e” and you should be all set.
Troubleshooting
Make sure Scratch sees your PiSoC as Connected. Right next to the PiSoC header under the more blocks tab you can see the PiSoC’s status. Green means go, red means it isn’t connected.
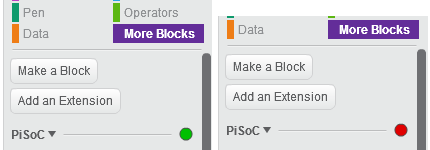
- If the status is red try the following
- Make sure your PiSoC’s slide switch is in “Run” mode before you plug it in.
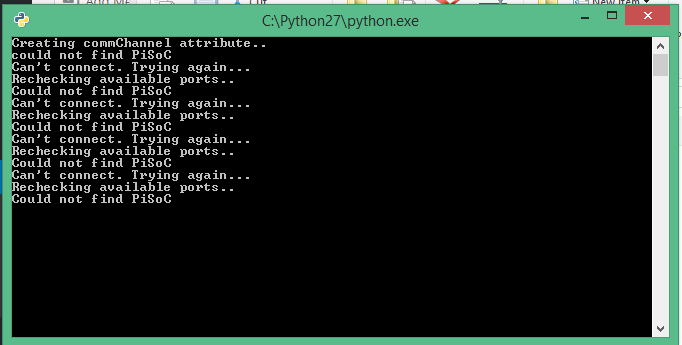
- We run a Python window in the background of Scratch, to communicate with the PiSoC. You should see it in your taskbar.

- If you see it, click on the Python window. You should see text showing the PiSoC sensor readouts.
- If your Python window looks like the following, your PiSoC software hasn’t been properly installed or your USB cable does not support data transfer.
- If your Python Window doesn’t appear at all, try installing Python and all the PiSoC dependencies again, making sure to check the add Python to path option in the installer. Regardless of whether the PiSoC is plugged in or not, the Python window should show up. If it doesn’t even after a reinstall, post in the comment section below with your computer’s operating system and we will work with you to resolve the problem.